How To Use Your Electric Brakes Properly
Your trailer brakes are designed to work in synchronization with your tow vehicle brakes. Never use your tow vehicle or trailer brakes alone to stop the combined load!
Your trailer and tow vehicle will seldom have the correct amperage flow to the brake magnets to give you comfortable, safe braking unless you make proper brake adjustments. Changing trailer load and driving conditions as well as uneven alternator and battery output can mean unstable current flow to your brake magnets. It is therefore imperative that you maintain and adjust your brakes as set forth in this manual, use a properly modulated brake controller, and perform the synchronization procedure noted below. In addition to the synchronization adjustment detailed below, electric brake controllers provide a modulation function that varies the current to the electric brakes with the pressure on the brake pedal or amount of deceleration of the tow vehicle. It is important that your brake controller provide approximately 2 volts to the braking system when the brake pedal is first depressed and gradually increases the voltage to volts as brake pedal pressure is increased. If the controller “jumps” immediately to a high voltage output, even during a gradual stop, then the electric brakes will always be fully energized and will result in harsh brakes and potential wheel lockup.
Proper synchronization of tow vehicle to trailer braking can only be accomplished by road testing. Brake lockup, grabbiness, or harshness is quite often due to the lack of synchronization between the tow vehicle and the trailer being towed, too high of a threshold voltage (over 2 volts), or under adjusted brakes.
Before any synchronization adjustments are made, your trailer brakes should be burnished-in by making 10-12 full stops from approximately 20 m.p.h. This allows the brake shoes and magnets to slightly “wear-in” to the drum surfaces.
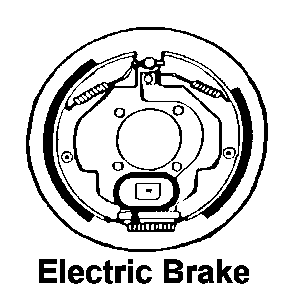
Actuating Block
--------------------Retractor Springs Primary Shoe----------------
------------Backing Plate
---------------Hold Down Spring
Magnet--------------------------- -------------Secondary Shoe
Adjuster Spring------------------------- ---------------------Adjuster Assy
!CAUTION!
DO NOT GET GREASE OR OIL ON THE BRAKE LININGS, DRUMS OR MAGNETS!
Brake Adjustment
Brakes should be adjusted (1) after the first 200 miles of operation when the brake shoes and drums have “seated”, (2) at 3000 mile intervals, (3) or as use and performance requires. The brakes should be adjusted in the following manner:
1. Jack up trailer and secure on adequate capacity jack stands. Follow trailer manufacturer recommendations for lifting and supporting the unit. Check that the wheel and drum rotate freely.
2.Remove the adjusting hole cover from the adjusting slot on the bottom of the brake backing plate.
3.With a screwdriver or standard adjusting tool, rotate the star wheel of the adjuster assembly to expand the brake shoes. Adjust the brake shoes out until the pressure of the linings against the drum makes the wheel difficult to turn.
KELLEHER SERVICE & SUPPLY, INC.
10 KELLY STREET*FERNWOOD, PA 19050
ph: 610-394-7663